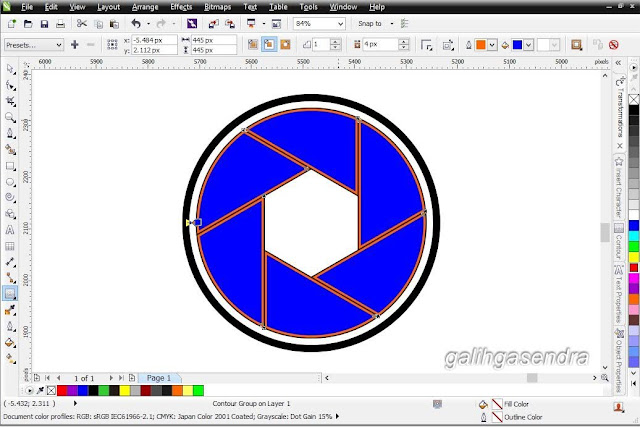
Step 1
Create circles with Ellipse tool (F7) and form a even circle by holding the Ctrl button. Create 3 circles like below. To align all in center, select all circles and press C (Align Centers Vertically) then E (Align Centers Horizontally) on keyboard. (I use color variation to make this tutorial more clearest).
Step 2
Select the middle and outer (red and blue) circle then use Front minus back if the blue in front of red or use Back minus front if vice versa.
Step 3
Coloring it to black and disable the outline (we call it Border object).
Step 4
Create a stright line like shown below with Pen tool (Hold Shift button on keyboard to lock your path while adding new anchor point for 15-degree increments).
Step 5
Click again the line and it will show the rotation control.
Step 6
Drag the center of rotation control to center of the circle.
Step 7
Go to tab : Arrange>Transformations>Rotate or use Alt+F8 to show rotate transformation dock.
Step 8
Setting the rotate transformation value like shown below. Change the value of Angle of rotation to 60° and Copies to 5. Then click Apply.
Step9
Use Smart Fill tool to fill the area (I use orange fill color).
Step 10
Delete all lines and center circle.
Step 11
Select all six filled (orange) object then group them (Ctrl+G)
Step 12
With the grouped orange selected, choose Contour tool.
Step 13
With the size of my circle, I fill the value of Contour offset to 4px (I use blue color). Then click the Outside contour. We call the result (blue color) with Overlapping Blades object.
Step 14
Click the contour product (blue color) then right click and choose Break Contour Group Appart or Ctrl+K.
Step 15
Delete another object except the Border object and the Overlapping Blades object object.
Step 16
Coloring them to black (or any color of your taste) and disable the outline.You're done.
Another result with other line positions.
Another result with different Overlapping Blades (OB) number [Different rotate transformation setting].
5 OB : Angle of rotation = 72°; Copies = 4
6 OB : Angle of rotation = 60°; Copies = 5
7 OB : Angle of rotation = 51.43°; Copies = 6
8 OB : Angle of rotation = 45°; Copies = 7
9 OB : Angle of rotation = 40°; Copies = 8
10 OB : Angle of rotation = 36°; Copies = 9
Apologize for bad tutorial, bad English, and bad everything.
Hope this tutorial helpfully and thanks for visit.
Hope this tutorial helpfully and thanks for visit.
Click here for Lens Apperture Logo "Curve version" Tutorial


Thank you!!! (h)
ReplyDeleteCoreldraw Tutorial - Lens Aperture / Shutter Logo - Galih Gasendra >>>>> Download Now
Delete>>>>> Download Full
Coreldraw Tutorial - Lens Aperture / Shutter Logo - Galih Gasendra >>>>> Download LINK
>>>>> Download Now
Coreldraw Tutorial - Lens Aperture / Shutter Logo - Galih Gasendra >>>>> Download Full
>>>>> Download LINK Sl
Thankyou so much :) It was very helpful :) God bless you :)
ReplyDeleteExcellent tutorial, thank you very much for sharing them. I've already started to download CorelDraw X6. I looked how you do it and wanted to do something similar, but this time with a complete vector. Vectors I took here free vector clipart. And you can try to alter someone else's vector. Maybe you'd like to break stereotypes of other artists. I will wait for new tutorials.
ReplyDeletedont for this,,,,
ReplyDeleteI’m thankful for the article. Really looking forward to read more. Really Great.
ReplyDeleteYou will have a hard time believing what amount has changed inside the CorelDRAW family since our dispatch of CorelDRAW X8. Investigate the easy to understand new components, extended similarity and a man that is new to make you're feeling appropriate in the home. It's our numerous variant that is the compelling date for configuration, following, outline, picture altering, and site creation. The appropriate response is perfect both fledgling designers and specialists.
ReplyDeleteOne basic misstep individuals make at the earliest reference point is to offer their architect practically no heading. They discover an originator, give them the organization name and guide them to structure a logo. logo design service
ReplyDeleteCoreldraw Tutorial - Lens Aperture / Shutter Logo - Galih Gasendra >>>>> Download Now
ReplyDelete>>>>> Download Full
Coreldraw Tutorial - Lens Aperture / Shutter Logo - Galih Gasendra >>>>> Download LINK
>>>>> Download Now
Coreldraw Tutorial - Lens Aperture / Shutter Logo - Galih Gasendra >>>>> Download Full
>>>>> Download LINK lM
In the event that he wasn't hoping to do both of these he'd presumably stay with Shared Hosting.
ReplyDeletehttps://onohosting.com/
Really very informative post for CorelDraw lover. I appreciate Excellent tutorial. purplepages
ReplyDelete